DISCLAIMER

All rights of photos and text reserved. Usage of photos or text from my blog on other websites or for any other purpose only with prior permission. If you want to use any material from my blog please contact me by email.

Saturday, January 24, 2015

The New Phono Stage

Hi!

In last years Happy New Year post I mentioned that I am working on a new version of the single ended LCR phono circuit with an improved bias scheme. After some initial tests with a prototype using D3a tubes, I finished the final version of the concept using the fabulous Telefunken EC8020.


It's been a while since I built something with the EC8020. So after the tests with the D3a prototype have been so promising I decided to use it for this new phono stage which is now my top of the line single ended version.

The tubes are now arranged in the center with the LCR RIAA modules between the two stages. This has been done to radically shorten the signal path and adapt it to the new circuit. The power supply (left) remains in the usual style:


Some might dislike that the tubes on the signal section are not visible from the front. I actually like it for the understatement of partially hiding the precious EC8020s.

View from the top:


Since this is my current top phono stage, please understand that I sm not going to share the details of the circuit. Just so much that it simplifies the signal path considerably.

The covers on the signal section are larger than those seen on previous phono stages. This is because they are housing a transformer and a paper in oil cap. Here a photo of the top plate before the covers have been installed:


Actually a shame to hide those beautiful caps and mounting clamps:


A peek to the underside. Almost the entire signal wiring is in place:


The inside of the finished signal section, the additional caps are just for B+ smoothing and are not in the signal path.


Another view of the finished signal section:


Glowing tubes:


Of course the big question is now, how does it sound? I already wrote about sound improvements in the past whenever something got optimised or copper transformers exchanged for silver transformers. I don't want to bore you with yet more superlatives. Just so much: The new circuit is well worth it and I will keep it for all future single ended phonos.


I will exhibit at the High End fair in Munich again in May and will bring this phono preamplifier. Come to the show or visit Lindau for a listen.


Best regards

Thomas


Thursday, January 15, 2015

Tube of the Month : The 1602

Hi!

It is well known that I am very fond of the 10 and 10Y, as well as all derivatives of this family: UX210, VT25, 801, 801A and VT62. All these tubes have already been extensively covered on this blog. But there is one very special and rare variant which deserves it's own Tube of the Month post: The 1602:


The 1602 is a specially selected 10 for applications which require low microphonics. It was called '10 Special' before it received it's own number.

It shares all the technical parameters of the 10 or 10Y and of course has the same pinout. In my experience the regular 10 or 10Y are already quite reasonable in terms of microphonics and I use them regularly in line stages. Since the 1602 is even better in that aspect it is the perfect choice for preamps of course. I have no information about the intended application for which the 1602s got selected. If anybody has some more information about this, I would appreciate to know more. The tube was mentioned in the May 1936 issue of the All-Wave radio magazine. So I assume it was introduced around that time.

That magazine mentioned it's intended use in audio applications, which is not a surprise given the selection for low microphonics. Although I always had good results with 10Y tubes in line stages, where microphonics are critical, a tube which is even less sensitive is of course always welcome. It seems that the tubes have also been selected for electrical parameters. I can pick pretty much any two 1602 from my stash and they show perfectly identical plate curves on the curve tracer. This is of advantage for usage in differential circuits like my 10Y differential preamplifier. I am getting excellent results from this tube in preamps. It is not a different sound but the basic characteristics remain the same (which is expected) just with an even quieter background and perceived higher resolution. Don't try to hunt for this tube unless you are very patient and are willing to spend significantly more than is usual for a regular 10 or 10Y. I have been looking for these since well over 10 years and managed to acquire  only a few of them.

Apparently the 1602 was only offered by RCA and General Electric the latter under the designation GL1602:


Here a close up of the base:


The tubes are identical to regular 10 tubes from GE.


After the selection process they just got a paper sticker over the number 10. This can be seen here, the paper sticker has been peeled off from the left tube:


The 10 designation also is still visible when the tube is held against a light:


They came in very nice packaging. Oversized boxes with lots of padding material.


Beautiful orange/blue boxes


The GL-1602 with the filament lit up:


Here a RCA 1602 in globe shape:


The base:


The other side:


The globe tube from another angle:


Beautifully made with the glass arbor inside which aligns the electrodes.


Unfortunatly I only have one pair of the RCA 1602:


But they are in perfect condition with getter fully intact and matching plate curves.


Not sure if the 1602 was also offered by RCA in ST glass. I have only seen globes from RCA.


After I ended last year with a series of 3 Tube of the Month posts about some rather modern, easy to find and cheap compactron tubes, I thought I start the new year with something more exotic. I hope you enjoyed it.

Best regards

Thomas


Saturday, January 10, 2015

6GE5 Stereo Amplifier, Part 2 : Assembly

Hi!

The previous post about this project showed the schematic. Now lets see the assembly steps and photos of the finished amp.


While the schematic showed a power amp, I decided to build an integrated by simply adding a volume pot and input selector in front.

The ultra path oil caps, power transformer and the chokes are placed on top of the chassis. Both chokes will be hidden under a single cover.


Wiring of the heaters:


Adding some solder terminal strips for the passive components:


Completed wiring. The output transformers are placed inside the chassis:


The finished amp:


Front view:


View from the top:


The same view with the amp switched on:


Glowing tubes:


I am also offering kits for this amplifier. The prices are for a power amp version.

Iron set (power transformer, chokes, output transformers):

EUR 640,- (EU incl. VAT) / EUR 538- (outside EU)


Full parts kit (excluding chassis and wire):

EUR 890,- (EU incl. VAT) / EUR 748,- (outside EU)


Best regards

Thomas


Tuesday, January 6, 2015

Guest Post: D3a LCR phono built by Claus

Hi!

At last years ETF I had the pleasure to meet Claus from Denmark. He built a D3a LCR phono based on a partial kit from me and brought it to the ETF where it was shown in the danish room.


The unit was beautifully built and sounded wonderful. Claus put a lot of effort into the chassis and the result is stunning. He agreed to write up an essay about his experience while building it. And I am vary happy to be able to share his story with you:


How I ended up with a Thomas Mayer LCR phono stage

By Claus Fonnesbek, Denmark


Where do I start… Not at the beginning, I’ll skip all the boring stuff.
I have been building audio amplifiers and preamplifiers for many years, there even was a time where I thought I would do it as a profession, but that never happened instead it ended up being just a hobby.
I switched from vinyl to SACD 15 years ago, but sadly this format never got to be a huge success, now streaming is the “right” thing, but not for me, I like putting on a album and listening to the whole thing.
I first saw some of Thomas Mayer’s constructions at the triodefestival back in 2000, in fact a LCR riaa if my memory is correct.
After some years with different silicium based gear, I build a 300B power amp a few years ago, and after a long search I found a Thorens TD124 mkII in pristine condition I decided to return to vinyl.
I knew that I wanted something based on tubes and LCR riaa correction, my recently finished 300B power amp is using the C3m pentode, which I looked at first, but having a small stock of D3a tubes the Thomas Mayer LCR phono stage was the natural choice.
I got in contact with Thomas and it turned out that he was selling “kits” we agreed on a price for a kit including all the “iron” and oil capacitors, I would source the rest my self.
Thomas was kind enough to let me borrow his "portrait style chassis” design, so I have ended up with a LCR preamp very similar to the original.
To make sure that all the chokes and transformers would fit in the chassis, I started out with a 3D model, my chassis is a bit smaller then what Thomas uses and my arrangement of transformers and chokes is different.

To save space I’m using the LCR module from http://www.acoustic-dimension.com/ which I can recommend, I would have loved using a Tango module, but it is beyond economical reach.


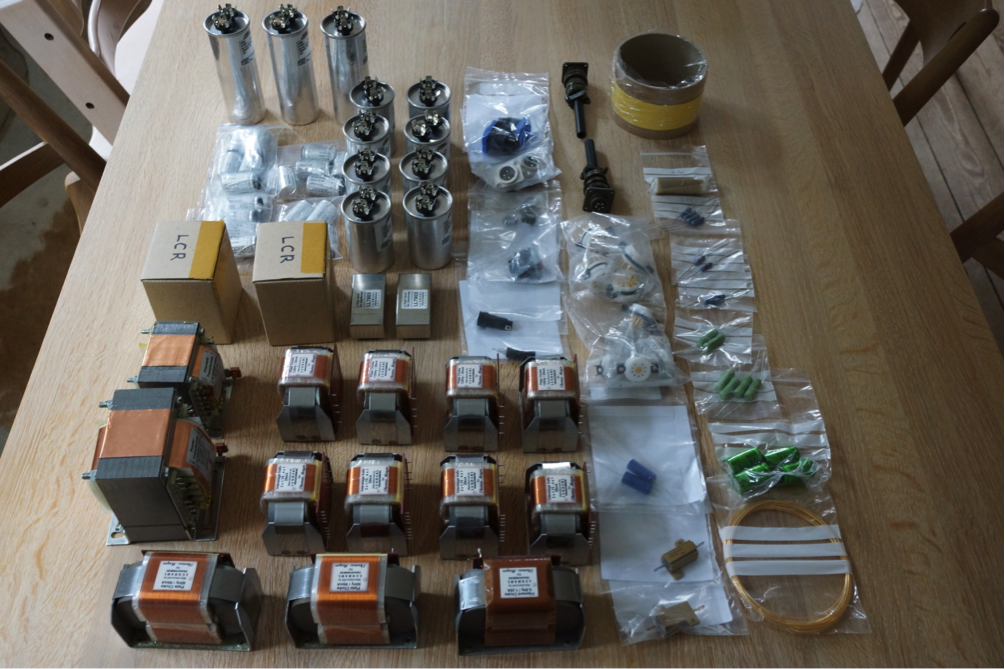
A week after ordering the parts from Thomas, I received all the Iron and caps, all was very well packed so no issues at all.
Shortly after I received the rest of the parts.


I could finish the design of all the mechanical parts, all the aluminum parts were ordered from Schaeffer AG, they do really nice work and I have used them for several projects.
The first test fit of the amp chassis can be seen in the picture.
I sandwiching the capacitors between the top plate and a sub plate which also acts as fixing point for the chokes and interstage transformers, this was done to keep all the screws hidden, in total there is only 8 screws visible.


Now the build could start, I started with the power supply, a purely passive power supply no regulation at all, B+ is L-C-L-C and filament supply is L-C, TV dampers for B+ and schottky for the filament.

The completed power supply before testing.


All the chokes and transformers are made for Thomas Mayer by Lundahl and Weiss.


Both the B+ and filament transformer has is a lot of tabs (different voltage combinations) on, which makes it possible to trim the voltages, making it possible to end up with the right voltages without any regulation.

Testing the power supply.


Nice glow from the tv dampers, they take up some room, but they look nice and they have a fairly slow start, which will help extend the life of the D3a tubes, and lastly they have the big bonus of being very cheap.


Now for the amp, a simple circuit, but a lot of big parts. Having made a 3D model first helped making the amp as compact as possible, with the added problem that everything has to be assembled in the right order, there is no room for mistakes and replacing a part requires a lot of skill or time to take it apart.

Half of the amp done, all chokes, small parts and most of the point to point wiring done.
The LCR modules are on top of the amp resulting in the shortest signal path possible.
Still missing the interstage transformers and the last wiring.


The last parts are fitted, interstage transformers and the final wiring, it ended up being quiet a challenge to solder the last wires.  One thing is making a 3D model, it is totally different assembling it in real life.


After some quick measurements I was ready for the listening test, so how does it sound ?
Well I’m not the right person to judge that, it will be really difficult for me to be neutral, I could of course use all the standard acronyms, but I wont.
A very good friend of mine gave it a listen recently, his judgment was very positive.
We listened to a stack of very well known records and one of the things that were most noticeable was that we heard new thing from the groves that wasn’t heard before.

Inspired by Thomas’ outdoor model shoots, here is a couple of photos of the finished amp, the chassis is solid walnut treated with tru-oil, a lengthy process where one can keep going indefinitely, oil, sand, oil, sand, oil, sand, oil and onwards, I stopped after oiling about 20 times.


Last words, a very big thanks to Thomas for his assistants during the build, always ready to answer my at times stupid question.
So what’s next ? maybe a matching preamp.

Thanks
Claus Fonnesbek


Thanks a lot to Claus for sharing this story! And congratulations for the wonderful build!

Best regards

Thomas