DISCLAIMER

All rights of photos and text reserved. Usage of photos or text from my blog on other websites or for any other purpose only with prior permission. If you want to use any material from my blog please contact me by email.

Monday, January 31, 2011

Single Ended Amplifier Concept, Part 4

Hi!

As mentioned in the first part of this series, this amplifier concept can be scaled down for a low cost version. Although this will impact the sound quality the scaled down version will still perform very nicely. There are three areas which we can look at to reduce cost: capacitors, interstage transformer and power supply. The basic concept of such an amp has already been shown in the first part.

Instead of an interstage transformer, the more common RC coupling can be used. The interstage transformer will be replaced by a plate load resistor and a coupling capacitor. A 50kOhm resistor will work nicely. This resistor will dissipate some power so it should have at least a 10W rating. Two 100k resistors can be used in parallel. If you want to use a single resistor, a 47kOhm will work just as well. The grid of the output tube will need a resistor to ground. The datasheet of the 6CB5A gives 500k max for this resistor. A coupling cap of 220nF or higher will provide a very low roll of frequency with this 500k. Obviously the quality of the coupling cap will have a large influence on the sound. A good MKP type is what should be used. Expensive 'boutique' caps should be avoided however. This is a cost down amp, so an expensive cap would not fit into the concept, we could rather stick with the interstage transformer. The voltage rating of the coupling cap should be chosen such that it can withstand the maximum voltage which can appear at start up or during fault conditions. It should be 450V or higher.

Here is the detailed schematic of the 'low cost' amp with all parts values and approximate voltages:

Both stages and both channels use a single common filter cap, which is shown in the PSU section further down. Since we are not applying the ultrapath concept in this version, the cathode resistor of the 6CB5A needs a bypass cap as shown. Also the driver stage uses a cathode bypass cap. Otherwise the gain would be lower. Gain is already reduced by about 3dB compared to the transformer coupled version, so let's not reduce it further by omitting the bypass cap. We also want to keep the output impedance of the driver as low as possible. All other parts remain the same as for the transformer coupled version.

The power supply also offers some possibilities to reduce cost. A capacitor input filter will simplify the PSU since it requires less secondary voltage from the transformer. But we want to keep at least one choke in the supply. Going to a solid state diode bridge for the rectification will reduce complexity of the power transformer further, since it only needs one heater winding and the HV voltage does not need to be center tapped:


Just two windings on the power transformer, a Single 350V winding which should have at least a 300mA rating. As mentioned above, the capacitors can be electrolytics. They need to be of sufficient voltage rating of 500V minimum. We need the voltage rating to be above the B+ level since the voltage will rise somewhat in case the PSU is not loaded. not as much as a choke input filter though. Since 500V electrolytics are difficult to find, a series combination of 2 250V or 350V capacitors will do. If you use series combinations for the caps, each needs a resistor in parallel to equalize the voltages as shown in the schematic. These should be 2W types or higher. They serve at the same time as bleeder resistors which ensure a save discharge of the PSU when turned off. If single capacitors are used rather than series combinations, a separate bleeder resistor should be installed. It is not important to have the exact capacitor values as shown in the schematic. Anything which is in the same range will do.

You might want to experiment with film bypass caps across the electrolytics. I myself am not fond of bypassing. It can create more colorations than advantages. But that is another topic. You can experiment as you wish. But keep in mind this is a scaled down version, so probably a better path for upgrading will be to change to interstage transformer and oil caps.

Of course any mixed form between this RC coupled and the transformer coupled version can be built. As shown the cost of this version is about 50%. For example you can start with the RC coupled driver but immediately apply the oil caps and ultrapath concept in the output stage. This way less changes will be necessary when the amp gets upgraded later on.

Actually by far the most 6CB5A amps I know of have been built in the transformer coupled version. In fact I got many questions about how the concept can be improved rather than scaled down. In the coming installments of this series I will show some beefed up versions with Tango transformers and a yet improved power supply.

Best regards

Thomas

Wednesday, January 26, 2011

Single Ended Amplifier Concept, Part 3

Hi!

The circuit of the amp his been detailed in the first two parts down to each component. What has not been covered yet is the power supply. So let's concentrate on this now. The requirements have already been set. The B+ is about 425VDC. It has to supply both channels. Each output draws 70-75mA. The drivers take 6-7mA each. The bleeder resistors swallow another 15mA. That sums up to almost 200mA.

The heaters are all connected in parallel. The 6CB5A draws 2.5A per tube, the 6N7 0.8A. That is 6.3V/6.6A for the heater supply.

Basically any power supply which can deliver these voltages at the given currents will do. But of course we will also propose a good solution to go with the circuit as presented in the first two parts.

Some deviation from the targetted 425V is not critical. This can move up a bit, as long as the max plate dissipation is not exceeded. The plates of the 6CB5A will start to glow red if they are beyond their maximum. In that case reduce the B+ voltage until the glow disapears. If you cannot reduce the voltage in the supply, you can dial down the current by increasing the cathode resistor.

The heater voltage should be as close as possible. I'd rather have the voltage a bit below than above the nominal 6.3V. Anything between 6 and 6.3V is ok.

As has been mentioned in the first part, we don't want the average cheap PSU, but something nice, yet affordable. So let's go for a classic choke input filtered supply with tube rectification. The choke input supply has some advantages. Voltage regulation is better compared to cap input. Current draw is spread over the whole conduction angle of the diodes rather than in pulses as with cap input. This means less current spikes with the potential to creep into our amp circuit. Also the rectifier and transformer have to deliver smaller current amplitudes and get less stress. But nothing comes for free, there are also disadvantages. The resulting DC voltage is much smaller at a given secondary voltage, about 0.9 times the secondary voltage versus the theoretical maximum of 1.4 times secondary voltage for cap input. The first choke needs to be rated for choke input duty, otherwise it can exhibit mechanical buzz.

Since we have chosen unusual and low cost tubes for the amp circuit, we will do the same for the rectifier. So we stay clear of the typical rectifiers seen in audio amps like GZ34, 5AR4, 5U4, etc. Looking into the TV tube arsenal we find the so called TV damper tubes. These have been developed to damp oscillations in the electron beam defelection system of TVs during the fly back of the beam. For this application they need to be capable of high current pulses and very high peak inverse voltages. There is an abundance of TV damper diodes with various bases, like 6AX4, 6AU4, 6CJ3, 6CG3. Unfortunately they are all single diodes, so two are needed for a full wave rectifer. But there is one exception. The 6BY5 contains 2 diodes in one tube. It has an octal base, so all tubes in the amp will use the same socket, which is a nice touch. Another good point is it's low cost. It lists for a few bucks in the catalogs of all major tube dealers. It's specs indicate more than enough current capability and peak inverse voltage rating. So let's use it.


The schematic above shows the complete power supply. Let's go through it component for component, starting with the power transformer. The secondary voltage can be estimated as follows. We want 425V DC out. There will be some voltage drop in the rectifier and in the chokes. Let's assume 25V. So the actual DC voltage we need out of the rectifier is 450. To get the secondary voltage we need to divide this value by 0.9 which gives 500V per leg of the secondary. that is 1000V across the entire secondary. Depending on the DC resistance of the windings in the chokes and power transformer the actual voltage might differ. But as mentioned it is not necessary to reach the exact 425V Anything between 400 and 450 will be pretty much ok. There is a nice freeware tool available on the web which does all those PSU calculations for you: The power supply designer PSUD2. Download it and play around with it. Very useful and educational tool!

As determined above, the supply needs to deliver 200mA. The choke input supply draws current continuoulsy during the conduction angle of the rectifier tube, but only from one half of the secondary winding at a time. The textbooks say that with choke input the current capability of the secondary winding should be about 10% higher than the DC current drawn. That would translate into 110mA across the whole secondary (220mA divided by 2 since each half only needs to deliver current 50% of the time). But it doesn't hurt to over specify the power transformer. This yields better voltage regulation and less heating of the transformer. So let's pick at least 150mA. For the first batch of power transformers I got wound for this project I spec'ed even 200mA.

There are also the heaters of the tubes which need to be supplied with 6,3VAC. For AC heating there is no benefit in having these supplied from separate transformers, of course it would not hurt either. I got the heater voltages wound on the B+ transfomer as well. We need separate heater windings for the rectifier and for the amplifier tubes. The 6BY5 does not withstand a very high voltage difference between heater and cathode as other TV dampers, so best to have the heater on the cathode potential. This is achieved by simply connecting one end of the heater directly to the cathodes as indicated in the schematic. Of course that means we need separate windings since we want to reference the other heaters to ground. The requirements for the heater windings are 1,6A for the 6BY5 and a total of 6.6A for the signal tube heater winding. Both heater windings need to have sufficient isolation between them.

Another important feature of the power transformer is the screen between primary and secondaries. Without a screen winding, there is capacitive coupling between the windings. This would allow high frequency crap from the mains to pass straight through. With the screen winding in between both primary and secondary now have a coupling capacitance to ground rather than between them. As indicated in the schematic I got my transformers wound with two independent screens. One is connected to protective earth and chassis and the second to signal ground.

Not indicated in the schematic is a feature which I get on all my power transformers. Taps on the primary for some fine adjustment of roughly + or - 5%. Instead of 0-230V the primary actually is 0-220-230-240V. Also not shown are mains on/off switch and the mains fuse. The average DIYer should be able to sort out these details himself.

The schematic shows two LC sections, each with a 10Hy choke and 40uF cap. As mentioned in the first parts, amp circuits with ultrapath connection and no cathode bypass cap need very well filtered B+. You might get away with just a single LC section. Then it is advisable to increase the capacitance and use cathode bypass caps at least on the driver tubes if there is still some hum. With a supply as drawn, there will be no hum even with very sensitive speakers.

The first inductor needs to be wound for choke input duty. Otherwise it can exhibit mechanical buzz due to the large AC voltage across it. You might get away with a choke for cap input service if it is sufficiently derated. A small input cap of 100nF can help if you have some mechanical buzz. This cap should be rated for at least 1000V since it can see high voltage spikes. This optional cap is shown in grey in the schematic. I use Lundahl LL1673 chokes. They are made for use in choke input supplies and work excellently in this PSU.

The heater supply for the signal tubes is referenced to ground via two 100 Ohm resistors. 2W types are sufficient for this. The third resistor is a bleeder. It ensures that the minimum current is drawn from the supply to maintain proper choke input operation. As a rough guideline 1kOhm load is needed per Henry inductance of the first choke. The first choke is 10Hy, so a load of roughly 10kOhm is needed. Since there are already bleeder circuits in the amp (22k and 6,8k in series per channel) we only need a 33k which in parallel with the other resistors gives about about 10k. Since this resistor dissipates quite some power, a 20W type is needed. This ensures that even with tubes unplugged or failing tubes, the current will not fall below the critical value. This resistor can be left out if the capacitors have sufficient voltage rating. If sub critical current is drawn the filter will stop working as a choke input but behave like a cap input and the voltage will rise by up to 50%. To be safe in a fault condition or when the power supply is tested without amp circuit attached we don't want the caps to blow. So either overrate them or install the bleeder circuit, or both to be on the save side. I selected ASC X386 440VAC caps. The DC rating of these caps is 630VDC minimum.

With this post all details have been laid out about this amplifier. In the next parts I will first show the cost down version in detail including it's power supply. After that I plan an article about an improved version of the power supply using a full wave Graetz-bridge with tubes. And after that we will see how this concept can be adapted for directly heated tubes as well.

Let's close this post with some photos. The first row shows the interior of 6CB5A amps based on the same circuit, built by different people


Here some 6CB5A amps with different chassis styles and output transformers:


The top row shows implementations with Tango, James and Hashimoto transformers. The second row shows a pair of monoblocks using Lundahl tranformers and the blue one is a Push Pull version, again with Tango.

The last picture shows an amplifier based on the very same circuit but with the power supply separated into an external chassis. There is a minor difference in the power supply though, instead of a 6BY5, two 6AX4s are used as rectifier. Both interstage and output transformers are Tango. NC20F interstage and FC30-3.5S output transformer:


Best regards

Thomas


Sunday, January 23, 2011

Making of an 45 / 2A3 amplifier

Hi!

Some photos of an amplifier that uses all directly heated triodes:


This amp can be used with 45 or 2A3 output triodes. The settings for the tube are selected by a switch. Also different input tubes can be used, either 801A and similar (10Y, VT25, VT62 ) or 26 (also UX226). In the picture above 45s and VT25s are plugged in.


This picture shows the amp with globe 45s (UX245) and globe UX226. The amp is not finally fixed to the frame, so some screws are missing. Also the bottom plate with feet is not attached yet.

This series of photographs illustrates the assembly process.

For easy handling the metal plate which carries all parts is mounting into an assembly fixture. This allows to turn the whole assembly upside down or sideways without the danger of scratching the transformers or capacitors.


First the tube sockets, connectors (RCA inputs, loudspeaker outputs and power supply connector) and switches are fixed to the metal plate.

Then the capacitors and transformers are mounted. The second picture shows how the capacitors are fixed to the plate. The transformers used are Tango XE20S for the output and the Tango NC20F interstage.

This picture shows the wiring of the first level. All signal wiring is done with teflon insulated solid core silver. For mechanical protection of the fragile silver wire it is pulled through an extra insulation sleve.

The parts have been arranged for short signal paths. Therefor the input tubes are at the back, nearby the input jacks.
After completion of the first level wiring. All parts which are inside the wood chassis get mounted on a frame made of aluminum profiles. These are fixed to the main plate by metal stand offs.

The driver tubes filaments are supplied with DC. The output tubes are AC heated. Therefor a filament transformer for the output tubes is placed inside the chassis (in the back row, center).
Other components inside are: 4 B+ chokes, one for each stage and each channel for decoupling. Also 2 filament chokes for the drivers and another 2 capacitors for which there was not enough room on the top. And finally cathode resistors and also some resistors which get switched in for correct setting of filament and B+ voltages and operating points for the various tubes which can be selected.
This picture shows how the components are arranged in a 3D-fashion and interconnected.

All the wiring is completed and the amp is ready to be tested.

The power supply still needs to be built. It will be placed in an extra chassis and built up in a similar style.


Here are a few more shots of the amplifier:


Best regards

Thomas

Saturday, January 22, 2011

Single Ended Amplifier Concept, Part 2

Hi!

The concept of the amplifier has been defined in the first part. Now I will write a little about the search for a suitable driver tube. Also the concept will be detailed further with values for supply voltages and passive components.

To have all requirements for the driver tube, we need to know the voltage swing and gain it has to deliver to drive the outout stage to full power with reasonable sensitivity. So let's flesh out the details of the output stage first. Since the 6CB5A is fairly cheap and can be expected to be very robust as is common with TV tubes, we have no fear to run it at maximum plate dissipation. Laying load lines on the plate curves and experiments with a 6CB5A in a prototype mock up came up with about 350V from plate to cathode and 70-75mA plate current. This requires about -70 to -75V on the grid. A 1kOhm cathode resistor will provide the correct operating point. This means the amp needs to be fed with a B+ voltage of about 425V.

A bias voltage of 70 V means the output tube requires 140V peak to peak for full power. This translates to about 50V RMS (amplitude of the signal divided by the square root of 2). In my post about gain, headroom and power I already wrote about the preference of having not too much gain, so I would shoot for a input sensitivity between 1V and 2V RMS. This means we need a gain of 25 to 50 from the driver stage. This is a bit above the gain which the common 6SN7 would deliver, so let's look for something else. Choosing the one of the most widely used driver tubes would be boring anyways. We also want something which is not too expensive.

The driver tube needs to be able to drive an interstage transformer so it cannot have a plate resistance which is too high. Brwosing through the databooks came up with two interesting types: the 6AM4 and the 7F8, the latter is a double triode with a common cathode, so both sections would need to be wired in parallel. The 6AM4 would even provide a higher gain than targetted, around 80. The 7F8 would be 38.


I had some suitable output transformers lying around, A pair of Tango XE-20S. As interstage transformer the Lundahl LL1660/10mA could be used. A prototype was built with components out of the parts bin.

The prototype had two sockets wired in parallel for a quick comparison of both the 6AM4 and 7F8 as drivers. As caps I used 25uF MKP types.

The Tango XE20S is a universal type which allows to select primary impedances of 2.5, 3.5 and 5kOhms.


For the power supply I reused something which I had assembled for another project. It allowed selection of different B+ voltages. It got set up for the required 425V. It also delivered the 6,3VAC for the heaters of 6CB5As and driver tubes. All heaters got wired up in parallel and referenced to ground via two 100 Ohm resistors.

A group of people got invited for the initial listening. Some other amps were also available for direct comparison. Among them a 300B amp, a PP 46 and also a very elaborate 801A amp.

The amp was an instant hit. It sounded much much better than I would have expected or hoped for. It instantly beated the SE300B and PP46 amps. It had no chance against the 801A amp which was built with 4 times the budget for parts. This was very encouraging and sparked quite some interest among local DIYers. The owner of the 300B amps immediately decided to sell them and switch to 6CB5A.

Before I started to rebuild the amp in a nicer chassis, I spent some more thought on the driver tube. Although the 6AM4 and 7F8 both performed quite well they did not have enough headroom. It was just ok for transformer coupling but would not have been enough for RC coupled versions. So back to browsing the databooks. The 6N7 caught my interest. It would provide similar gain as the 7F8 but more headroom, enough to also use it RC coupled. It is quite linear and has an octal base as the 6CB5A. It is a double triode with common cathode like the 7F8. The prototype got modified for the 6N7 as driver. It has a max plate voltage of 300V so B+ needs to be dropped via a resistor form the output stage. This also serves as decoupling together with a capacitor. A 1kOhm cathode resistor gives an op point of about -6 to -7V on the grid, 6-7mA. That's a good 9-10dB headroom in the driver stage.

A listening test confirmed that the 6N7 was a much better choice as driver. The amp got more refined, more neutral than before, retaining all the sonic qualities which it shares with other excellent single ended concepts.
Now it was time to build a 'serious' version of this amp. Capacitors should be upgraded to oil types. For this purpose I selected ASC X386 series caps. 30uF/440VAC types. Since there was enough interest from other DIYers, I specified a heavy duty power transformer and got a batch of them wound from a local manufacturer. The power transformer was spec'ed such to allow some flexibility for adjustment of the voltages and flexibility to use other tubes as well.

Here is the schematic of the signal section of the final version of the amp with all component values and approximate voltages. No need for 1% parts. Also the exact voltages are not critical. The design has enough headroom to allow for some leeway there.

Let's go through each component and clarify it's purpose and value. Starting at the amps input, we see a 100k resistor to ground. This is providing a reference for the grid of the driver tube and a path to ground. The maximum allowable value for the 6N7 is 500k. 100k is a good value which will present an easy load to almost any preamp. This value can be lowered or increased, 47k or 200k would be fine too. No speacial wattage needed here, 0.5W is fine. This amp is DC coupled at the input. Some amps cap couple the input to provide protection if the preamp has some offset. This amp is fairly insensitive to DC offsets, even a offset of 100mV would not do any harm. If a preamp has more offset it should be replaced anyways. So let's avoid a cap in the signal path here. If you want to have DC protection however, don't hesitate to put one in. Many amps also make excessive use of grid stopper resistors. I left them out. These are not needed for lowish transconductance tubes like the ones in this concept. With careful layout there will be no danger of parasitic oscillation. Again, if you feel better with grid stoppers, put some in. But don't exaggerate. a few 100 Ohms is enough.

The 6N7 has both cathodes wired in parallel, the pin numbers are indicated in the schematic. A 1kOhm cathode resistor takes care of the setting of the operating point. 0.5W or higher can be used for the cathode resistor. What is not shown in the schematic is the connection of Pin 1. This Pin is connected to the envelope if a metal verison of the 6N7 is used. Pin 1 should be connected to ground. Another nice touch about the 6N7 driver: If you compare it's pinout to the 6J5, you will realize that they are interchangeble. The 6J5 will bias up correctly in the same circuit if dropped in. It will just lower the gain. So if there is too much gain in the system, the 6J5 is an easy way to reduce it.

The interstage transformer is a Lundahl LL1660/10mA it is wired 1:1.125 (connection alternative S in the datasheet). The 6CB5A does not need a grid to ground resistor since the secondary of the interstage transformer provides a ground path. This path is very low in DC resistance. In case the output tube is overdriven, which causes grid current it is routed to ground through this low DCR path. This allows the amp to recover quickly from overload conditions. You can experiment with a grid resistor which will terminate the transformer. This usually improves the square wave response. Sonically, I prefer to run transformers unloaded whenever possible.

The 6CB5A is biased with a 1kOhm cathode resistor. Here a high wattage type is needed, 20W or more. This is because of the high voltage across the resistor. It gets quite hot! The 6CB5A is wired in triode mode, the screen grid is connected to the plate through a 100 Ohm screen stopper resistor. Place this resistor as close to the pins as possible.

The output transformer can be any type between 3 and 5 k primary impedance which can be run with 70mA DC. Suitable types: Tango XE20S, Tango FC30-3.5S, Lundahl LL1663, LL1664, LL1682 and others. There are also types from winders like Tamura, Hashimoto, James and many others which would fit.

As mentioned above I selected ASC X386 MP in oil caps. All values are 30uF/440VAC. These caps sound excellent in this amp, better than the MKP types used in the first prototype. Any other cap of similar value and sufficient voltage rating can be used. The exact cap value is not critical. Also higher capacitances can be used.

The 6,8k/20W resistor provides dropped voltage to the driver and decouples the driver supply with the cap following it. The 22k resistor to ground from the driver supply acts as voltage divider together with the 6,8k and as bleeder resistor. It will ensure that the power supply is always discharged when the amp is switched off.

In part 3 I will describe the power supply and also show some photos of the assembly process of the amp.

Stay tuned!

Best regards

Thomas

Tuesday, January 18, 2011

Single Ended Amplifier Concept, Part 1

Hi!

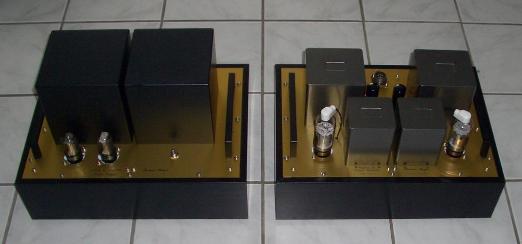
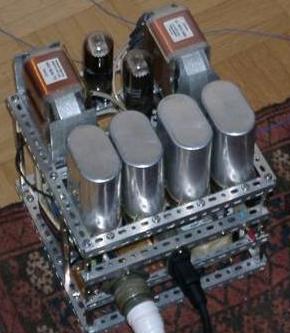
In the poll most visitors voted for single ended amplifiers. Most of them for a low budget amp, but many also for a cost no object SE amplifier. So let's see how we can cover both with a single concept which can be adapted to various budgets and will deliver exceptional sound quality within a given cost range. 'Low budget' has quite a different meaning for different people. So let's discuss this first. In a DIY project there is a wide range of possibilites to influence the budget. The more time you are willing to put in to search for cheap parts, the lower you can go. Since this concept needs to be reproducable we need to resort to readily available parts. The foundation of a good amplifier is the iron: output transformers, interstage transformer (if any), power supply transformer and power supply chokes.

As I mentioned already in the post about the 6CB5A, the idea for this concept was born on the german tube forum Röhren und Hören. There was a thread about a DIY amplifier concept which should be fairly easy to build, affordable and provide excellent and hum free sound. The desired cost range was determined through a poll. The result was a budget of 1000 Euros for all electronic parts, including tubes but without chassis material. This should be for a stereo amplifier. Of course there was a wide spread in the votes for the budget, so some flexibility was desirable to be able to scale the cost down to 500 Euros by selection of cheaper parts or a simplified concept and also to scale it up by using better parts, building mono blocks, external power supply, etc. But the requirement was that the base concept for the cost of 1000 Euros should deliver exceptional sound quality and come with very good parts.

There was a clear preference for a single ended amplifier concept. But not too low in power output, something which gets closer to 10W than to 1W.

Many people would have liked the 300B tube but that would have taken out a big portion of the available budget. Especially if there is the desire for some spare tubes. And no way to even think about original manufacture Western Electrics with the given budget. And in my opinion: If you want 300B sound go for original WE 300Bs (not the reissues of the 90ies) but that will be covered in a later post. Most people are too focussed on just the output tube anyways. It is the whole concept which determines the sound quality. Driver stage at least as much as the output stage. And of course the power supply. Most designs have 4-5 parts in the signal path per stage. Well optimized designs get it down to three. All of them have an equal influence on the sound quality. This is a very simplified view, but if you look at it this way, the output tube maybe contributes a third to the overall quality of the output stage. Power amps have 2-3 stages, so best case, the output tube makes up one sixth of the overall sound. And this is not even counting the power supply! Therefor equal effort was spent in this concept to get all parts on a comparable level. I'd rather listen to a well designed amplifier with a lesser tube than the 300B but with solid iron and capacitors, than a 300B amp with cheap output transformers, electrolytic caps and a marginal design.

There was another reason not to go for a directly heated triode like the 300B. The amplifier should be as hum free as possible even on sensitive speakers. A directly heated triode would have required DC filament supplies, except maybe the 45 or 2A3 which run on 2,5V filaments. But these were ruled out due to their low output power. A DC filament supply would have added cost and complexity. An indirectly heated triode would be as simple to use as it can get with regard to heating.

How that lead to the choice of the 6CB5A was described in the tube of the month post from last week. Besides exceptionally low cost, the 6CB5A has another advantage. It's operating points and requirements to the output transformer are very close to that of the 300B. So the same concept could be very easily changed to the 300B output triode and a comparison between the too would be very easy, even allowing the comparison in the same amp, with the same parts, except for an additional filament supply for the 300Bs.

With the tube cost beeing so low, that left almost the entire budget to spend on high quality parts, especially the iron. But before we come to the choice of parts, the basic architecture needs to be defined. The number of stages in an amplifier has a major impact to the complexity (and also cost). This is also dependent on the gain requirements. If you read my post about gain, headroom and power, you'll remember that my philosophy is to use only as much gain as is necessary, with as much headroom as possible. This lead to the choice of a two stage concept (driver and output stage). To keep complexity low, the driver should be supplied from the output stage B+ via a separate decoupling circuit (RC or LC). Interstage transformer coupling would yield good headroom from a given B+, better than RC coupling. Also transformer coupling was not very widely used ta that time in Germany, so such a solution would bring some new concepts into the scene. Of course also because I always got the best sonic results from transformer coupling.

The requirement for the concept to be fairly easy to build naturally leads to cathode bias as the method to maintain the operating points. This avoids additional supplies for bias, and any complexity to ensure the right sequencing  order of the supplies during turn on. Just a single B+ supply for both channels. Tube rectification will take care of delayed and slowly rising high voltage. In order to use something better than average, a nice, classic choke input filter approach was selected for the HV supply. Again to keep it simple also for beginners to build, no regulation in the pwer supply just good solid passive filtering.

So the basic architecture was defined. A two stage transformer coupled concept, using indirectly heated tubes, cathode biased with a single tube rectified  and choke input filtered B+ supply and AC heating throughout. No silicon at all in the entire amplifier.

Where does this leave us with the budget? Here is a raw calculation: A good choice for excellent sounding transformers at moderate cost is Lundahl . They have a wide range of suitable tarnsformers. For the primary impedance requirement (3-5k) of the output transformer the LL1663 or LL1664 would be suitable. That is about 250 Euros the pair. The LL1660 interstage tarnsformer is about 180 the pair. A heavy duty power transformer for the PSU would be around 100-120. Chokes come at 50-75 each, depening on supplier. At least 3 chokes would be required. One for each channel for decoupling. One in the common PSU, better two since additional smoothing might be required due to choke input. That is 200-300 Euros for the chokes. This sums up to 750 Euros max. For the iron which leaves 250 Euros for the rest. Since tube cost is low, this allows even for some nice oil caps.

Here is a sketch of the schematic of the concept so far:


Straight forward circuit, a separate choke in each channel which allows the use of a common supply with minimal interaction between the channels. The driver stage B+ is derived from the same supply via it's own RC filter segment. In a more elaborate implementation this could be upgraded to LC, but since we are on a moderate budget, let's stick with RC here. But wait, there is one unusual aspect which is not commonly seen: The capacitors from B+ to cathode in both output and driver stage. This is the so called 'ultrapath' concept. The origins of this approach go back to the engineers from Western Electric. Lynn Olson covered this on his website in an article Western Electric - Rosetta Stone for Triodes. As far as I'm aware the first person to mentioned this approach again in 'modern' times and who re-introduced it to vacuum tube audio is Jack Elliano of Electra Print. He is also the one who named it 'ultrapath' in an article in the magazine Vacuum Tube Valley.

What ultrapath basically does is to provide a 'shortcut' for the signal path. Normally the signal would traverse from the tubes plate through the primary winding of the coupling transformer to B+. From there through the power supply (usually the last cap in the filter chain) to ground. From ground through the cathode resistor and/or the cathode bypass cap (which usually is an electrolytic) to the cathode of the tube. The ultrapath cap is usually fairly low in value and a high quality cap can be chosen. It bypasses the cathode circuit with it's electrolytic alltogether. Depending on the circuit, tube and output transformer, often the cathode bypass cap can be left out with the ultrapath connection. For clarity it is left in the above scheme.

There is quite a lot of misunderstanding out there about the purpose of the ultrapath cap and it also got some bad press recently. In my opinion it is a very effective and cheap way to boost the performance of any transformer coupling stage by reducing the components in the signal path. It can also be used to reduce powers supply rejection, since it couples residual ripple from B+ to the cathode. The ratio of ultrapath and cathode cap can be chosen such that ripple is cancelled out. But this is not the purpose of this approach here. We only use it to control the signal path. Especially if the cathode cap is omitted, ultrapath will require a very well filtered and hum free B+ supply, since ripple is coupled to the cathode. Hence the provision for the second choke in the PSU, which will be 3 LC stages if the separate decoupling chokes per channel are counted.

If the available budget is much lower, the circuit can be significantly reduced, by abandoning the ultrapath concept and changing the interstage coupling to RC. For further cost reduction, the individual decoupling filters can be replaced by a single electrolytic with high capacitance. Of course this will have an impact on the resulting sound quality. The change to RC coupling will also reduce the ehadroom in the driver since the driver tube will operate on about half the voltage. The other half will be consumed by the plate load resistor.

Here is the conceptual schematic of the low cost version:


Such a concept only needs 4 pieces of iron: 2 output transformer, power transformer and one choke. The choke could even be left out, but let's not make it to primitive it should still sound good. If a less oversized power transformer is used, the iron set would be around 250 for the output transformer (let's still use something very good like the Lundahls), 50 for the choke and 100 for the power transformer. That's 400 Euros for the iron set. Another 100 - 150 should be enough for the tubes, sockets, resistors and capacitors.
And the beaty of this: You could start with the simple RC concept and later upgrade to transformer coupling.

In the next parts of this series we will fill the concept with a bit more flesh. I will write about the driver tube selection and sizing of the resistor and capacitor values. After that I will present some power supply concepts for this amp and will also show how the design can be easily converted to use directly heated triodes like the 300B, 45, 2A3 or 801A in the output stage. But even there the journey will not end, the concept can be enhanced to an all DHT amplifier with directly heated triodes in the driver stage as well. Stay tuned!

Best regards

Thomas


Monday, January 17, 2011

Cool Links: www.theaudioeagle.com

Hi!

Besides technical concepts, amplifiers, circuits and music, I will also occasionally present links to websites which I like and visit regularily. The first one is the site of Norbert who is a good friend.


His site is called The Audio Eagle and is meant for sharing his passion for music and good sound.

The site is structured into various topics. Besides his own favorite gear and music Norbert writes about audio related events, like the Vienna Vibes which was hosted by himself in Vienna last year. Or the Berlin School of Sound and of course the Schall & Rauch events held in Munich a few years ago. There is also a section  about friends systems. Quite remarkable for example the site about Joe's designs.

Visit The Audio Eagle, browse through the different categories, and enjoy the journey through Norbert's passionate writing about his favorite topics. Don't forget to leave a note in his guestbook while you are there.

Below a photo of Norbert in front of his new speaker, the brand new Gamma Horn of David Haigner. This photo was taken at the Vienna Vibes festival where the attendees could have a first listen to this fascinating speaker.


The Gamma Horn and David's other speaker creations will be a topic for another post.

Best regards

Thomas

Sunday, January 16, 2011

Tube of the Month: The 6CB5A

Hi!

This is the first installment of the tube of the month series in which I will present tubes I like and use a lot or which I find remarkable. I will mostly introduce some tubes which are less known for their usability in audio circuits, but you will also read about some of the tubes which are quite common in audio circuits.

Although many of you might know that I'm ususally very fond of directly heated triodes, especially those with thoriated tungsten filaments, I will open this series with a tube type which you probably would not expect to be raved about from me: An indirectly heated beam power tube, meant to be used for horizontal deflection stages in TV sets, the 6CB5A.


Why such a tube you might ask. What brings a die hard user of directly heated triodes to the odd TV tube? Here is the story behind this: About two and a half years ago there was a discussion in a german tube audio forum called Röhren und Hören (translated: Tubes and Listening) about a DIY tube power amp. Details about that amp will be covered in an upcoming series of posts about a SE amplifier platform. One of the requirements for the amp was moderate parts cost. If you are like me and don't feel comfortable to start an amplifier project unless you have at least a dozen spares of the tubes, tube price becomes an important factor in the overall cost. Even the cheapest chinese 300Bs are $100 now. Considering just a single spare set that is $400 for output tubes alone. A dozen NOS 6CB5A will set you back just $60 or even less. And you don't even have to search a lot to find them at these prices. Almost every reputable tube dealer lists them for $5.

So I started to search for alternatives which could be used as output tubes in single ended amps and would deliver a similar output power as the average 300B amp, around 8W. I browsed the databooks and checked my stash. A natural choice were horizontal deflection tubes connected in triode mode. The 6CB5A came up as an candidate and luckily I had some in my tube stash. The pinout of the 6CB5A is shown on the left. A detailed datasheet can be found here. Unfortunately the datasheets of these types of tubes almost never show the plate curves for the triode connection. In oder to verify that the tubes I selected are at least moderately linear and usable in a no feedback single ended design, I set up an adaptor to test them in a tube tracer.

Most of them are actually quite non linear in triode connection. But the 6CB5A looks quite good. Below  are screen shots of the plate curves taken with a scope and a tracer.


The 6CB5A curves are shown in the left screen shot and the right one shows a Western Electric 300B for comparison (original manufacture not a reissue from the 90ies). The right most curve is a bit closer due to a glitch in the tracer, so ignore that one. Admittedly the 300B is more linear, but the 6CB5A looks quite similar. Definitely worth trying triode connected in a single ended amplifier and a low cost alternative to directly heated triodes.

The maximum plate dissipation of the 6CB5A is 26W. So it should be good for 6-7W in SE mode. Due to it's low cost there is no need to be nervous about running it at it's limits or even a bit beyond, so maybe up to 8W can be squeezed out. But more about that in upcoming posts.


The 6CB5A was manufactured by almost all of the major tube companies. The picture above shows a selection of 6CB5As from various brands. As with other tube types a lot of cross branding was common practice. So you will find 6CB5As of the same construction but with different brand names printed on them.


Above you can see a selection of 6CB5A tubes with different shapes and internal construction. The leftmost is actually a 6CB5, the predecessor which was built in a ST glass shape.

The tube uses the common octal base and has the plate brought out to a cap on the top. Being indirectly heated with 6,3V/2,5A should make it straight forward to build a hum free amplifier without the need for a DC filament supply.

Stay tuned for circuits with this tube. Here is an example of a SE amplifer with the 6CB5A:


Best regards

Thomas

Friday, January 14, 2011

Results of the poll

Hi!

Thanks to all who participated in the poll. Here is the ranking of the the project types the visitors would like to see:

1. Phono stage LCR RIAA
2. Low budget SE power amp
3. Cost no object SE power amp
4. New approaches to RIAA EQ
5. PSU concepts
6. Line stage with directly heated triodes
7. Full function preamp
8. Phono stage RC RIAA EQ
9. Low budget line stage
10. Other

The clear winner is the LCR phono, so you can expect this topic to be covered very soon. But I will start with the schematics for SE power amps first, for the simple reason that I have come up with a SE amplifier platform which can be extended from low budget to cost no object. A series of posts about such a concept would cover ranks 2 and 3 which combined together got the most votes.

On the left I copied the final overview of the poll results.

After the first topics have been covered, I'll move on to to the remaining topics which got significant votes, like other RIAA approaches and PSU concepts.

Many have asked me when they can expect to see details about directly heated line stages as the 801A / 26 line which I wrote about recently.As you can see it is not in the focus of most of the visitors. You can contact me via email in case you are interested and don't want to wait until I will post schematics of such a linestage.


Again thanks to all for your participation.

Best regards

Thomas

Sunday, January 9, 2011

More photos of the 801A / 26 linestage

Hi!

Since I got some requests to also show the power supply of the linestage, I'm posting some more photos. This time with ST-shape Hytron VT25s plugged in:


Below, you see the linestage playing in the system, fed from my EC8020 LCR RIAA phonostage:


Best regards

Thomas

Saturday, January 8, 2011

801A / 26 linestage with output transformer and TVC

Hi!

Here some photos of a new line stage which is just finished. It uses directly heated triodes and can be configured for 801A (will also work with 10Y) or 26. Adjustment for the two different tube types is done by the simple through of a switch. It uses an external tube rectified power supply in the same style. Filament supplies are separate for each tube, employing two filament chokes per tube in passive LCL configuration.


Here it is pictured with globe shaped 10Ys.

 The capacitors are NOS Paper in Oil types. For a nicer look the caps got sandblasted and repainted with some metallic white varnish.

Note the subassemblies which are mounted to the main plate via rubber vibration dampers. This is essential in a DHT linestage to minimize microphonics.

The linestage has 4 selectable inputs and 2 paralleled sets of outputs. Connection to the PSU is via a heavy duty military grade umbilical.

All signal wiring is done with teflon insulated solid core silver.

Some adjustment of the wooden frame is still necessary. The carpenter did not do a good job and they are slightly too big. They will be redone.


The output is transformercoupled using Lundahls LL1660 in 4.5:1 for a nice low output impedance. Volume controls are autoformers. These are custom made by Dave Slagle . Volume control is in 24 steps, 2dB each.


Best regards

Thomas

Friday, January 7, 2011

The search for that 'magical' operating point

Hi!

One of the most often asked questions about tube amps I get is: 'Which operating point do you recommend for tube xyz?' There is also a lot of discussions on forums about the 'optimal' operating point for certain tubes. I think it is time to present my view on this.

I'm puzzled when I see such a question posted somewhere, and straight answers are given down to the decimal point of a milliampere, without asking how the tube is loaded. I've also seen reports from people claiming that they tweaked their amp to the best possible operating point and that miniscule changes in that cause the sound to change significantly. Quite often people even think that their amp is of exceptional quality because of that. They think it must be a really good amp because it makes small changes in the operating point audible. Well, I think your design is marginal, if it is sensitive to small changes in operating conditions.

First let me point out, that the choice of a good operating point is largly dependent on how the tube is operated. Does it use a resistive load, inductive or a constant current source? What is the function of the tube under question, what constraints are there, what is the B+ voltage and in which range can it be adapted if necessary. And of course it is important to also consider the capability of the components around the tube. For example if it is transformer coupled, the current rating of the transformer is important.

If all that information is known, then the ideal operating point is chosen such that the tube's grid can be driven with about equal amplitude in both positive and negative direction before significant distortion kicks in. This point can be easily found on the loadline. But if the tube stage under question is designed with a lot of headroom as I described in an earlier post, then it will not be critical to hit the exact spot in the middle of that load line. Because of the headroom the operating point can be changed by some margin without significant changes in sound character. And this is important if you want a stable design. Tubes and also passive components age and shift their parameters with use. This results in shifts of operating points. I want my amps to have the same sound over the widest possible range of the tubes and components life time. Also in amps with passively filtered power supplies (which I prefer) the B+ voltage will change with mains voltage fluctuations. These should not impact the sound of an amp or preamp.

Let's clafrify this a bit further using a 801A/10Y linestage as an example. I chose this because in the recent days I got many questions about the ideal operating point of the 801A in a transformercoupled line stage. Let's assume the design is using a line output transformer which can be run with 20mA DC on the primary. This means it is capable to be run with up to 40mA before significant core saturation kicks in, so we have a range around the 20mA point which is about symmetrical from 0mA to 40mA. Before the transformer winders among you get excited: This is just for simplicity for the purpose here, actually things are a bit more complicated. We want to be able to use both 801A and 10Y, so we stay within the voltage limits of the 10.
We will pick 400V B+ which will result in -30V on the grid for 20mA current. In a cathode biased design this will require a 1.5kOhm cathode resistor, which will yield 30V drop with 20mA.

The graph on the left shows the plate curves of the 10. The loadlines for a resistive load (black) and transformer load (red) are drawn in. The transformer is assumed to be unloaded so the loadline is horizontal. The transformer load line is idealized. In reality it will look a bit different, but for the purpose of this topic this is fine. As the transformer secondary would be loaded with a resistance, the loadline would tilt side ways. For the resistive load a B+ of 600V would be required, while it is 400V for the transformer (neglecting copper losses, which don't play a big role in this case).
As you can see the plate curves are nice and evenly spaced between the point where they cross the red load line. We have a range of 60V peak to peak through which the grid can traverse. This means that the overload point for such a line stage would be more than 20V RMS (30V amplitude divided by square root of 2). That's what I call head room in a line stage where you typically have 2V RMS max on the input, may be 3 or 4V if you have unconventional sources with higher than normal output. The plate can swing between 150 and almost 650V without major distortion. That's 500V peak to peak or 180V RMS. Assuming a 4.5:1 lineoutput transformer (for example Lundahl LL1660) this will give up to 33V RMS output at an output impedance of about 250 Ohms. Plenty of headroom to drive even insensitive power amps and nice low Zout, so you can use long cable runs without any problem.

Now getting back to the topic of the operating point. If you shift the B+ voltage let's say down to 300V, things don't really change a lot, except the maximum possible output swing is reduced, but we have plenty of headroom to move in anyways. The same if you change the current. The operating point can be easily varied by plus or minus 25% between 15 and 25ma without significant changes. That's what I call a stable and wide headroom design. The tube can age (which typically results in less emission and less current) and the line stage will not change it's sound character much. Also no need to be picky about cathode resistors with 1% tolerance 5% is more than enough.

If you look at the resistive load line, things are a bit different. The spacing of the points where the plate curves cross the load line gets narrower as you move to the right. Here I would choose a different operating point to start with. Probably more like 300V/20mA this would move it to the more linear region. This also shows why I prefer inductive loading (CCS will be similar) or transformer loading with lightly loaded secondary.

So, if you experience significant changes in sound as you experiment with operating points, look at your design and fix the cause, rather than endlessly searching for the ideal operating point. You might be in the non linear region of the tube or some components in the design are marginal and already at the point where the current causes some stress. Move away from there, find a tube type which is more suitable for the case or find the components which are at their limits and change them.

Even if you think you have found a point which you like, think about this: As the tube is driven with signal, it moves through a whole range of points on the load line. It will behave differently at all those points. Imagine a piece of music which has some large amplitude bass notes, and some low level back ground vocals or piano is played along those notes. The low level signal portions will be amplified very differnt at the upper and lower peaks of the bass amplitudes. This is often very audible in marginal designs. When no bass note is present, vocals and piano lines might be reproduced nicely with beautiful ambience, but as the bass note kicks in the voices become less transparent and the ambience dissapears. In a good, wide head room design everything will remain stable.

I hope you enjoyed this little excursion into operating points and you will rethink and look at the bigger picture next time when you are asking yourself which operating point you should choose. When you finished a design, a good test for stability is to change the operating point and listen for changes in sound. If you hear changes with small shifts in the conditions, find and fix the cause.

Best regards

Thomas

Thursday, January 6, 2011

Gallery: Amps shown at ETF09

Hi!

Probably not every visitor of my blog is interested in technical details and schematics. Don't worry if you found my last post too dry and boring. I will also write about some other stuff, like favorite music and occasionally also about topics I find interesting but which are not related to audio. And of course I will also entertain you with some tube amplifier porn. So here is the first installment of the gallery section in which I will show photos of some amps and preamps I built.

First I'd like to thank Holger Barske who was so kind to send me photos which he took of equipment which I brought to the European Triode Festival in 2009. First photo is a close up of a single ended 801A amplifier:


This is a Stereo Amp with external PSU. 6N7 Driver stage, transformer coupled to 801A. All Tango transformers.

 This is another version of SE 801A amp. Same configuration as the other, but with a mix of Lundahl interstage and Tango output transformers.

This one is also powered from an external PSU.

One of the PSUs is shown in the next picture. It can be configured for various voltages so it is usable with different amplifiers.

The PSU has different rectifier sockets which are wired in parallel. It can use either of these: 5R4, 5U4, 5X4, 83, 5Z3 or a pair of TV dampers like 6AX4, 6AU4. There is a separate rectifier for the driver, a 6BY5. The filter can be configured for either choke or capacitor input.


Next is a picture of different amps. The 801A again in the front row left and a single ended 6CB5A amp besides it. In the second row is a mono 211 SE amp with it's PSU. In the back on the right side you see a power supply of a preamplifier. And finally a SE 300B in the left corner in the back:


And here the preamps, A 801A linestage and EC8020 LCR EQ phono stage:


Close up of the EC8020 phono:

Another univeral power supply with 866A mercury vapour rectifiers:


And here a picture of the complete system which was presented at the ETF09, besides the right speaker in the fron there is a SE 45 amp with it's power supply besides it:


Best regards

Thomas